

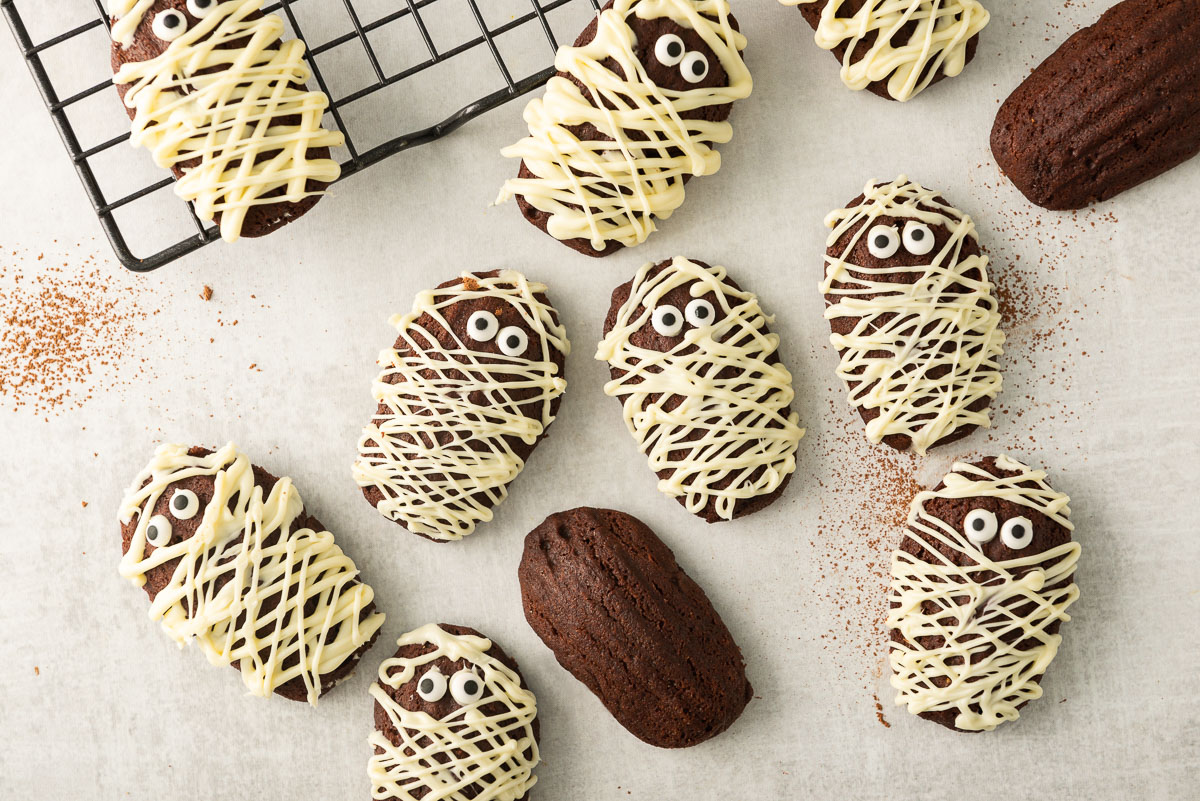
This recipe for Chocolate Madeleine Mummies brings the airy texture of a traditional French madeleine, combines it with the indulgent flavour of chocolate, and makes everything a little more fun with a tasty Halloween design! (If it’s any other time of the year…and you don’t want your madeleines to look like oh-so-scary mummies, I’ve got a fix for you too.)

Hey bestie! Quick disclosure: This post is sponsored by Williams Sonoma. All opinions expressed are my own. Thank you for supporting the brands that support this blog!
Did I mention that this recipe is a little more indulgent than your usual chocolate madeleine recipe? I probably did. But for good measure…these Chocolate Madeleine Mummies are an indulgent treat! Why, you ask? Well, instead of using just cocoa powder and calling it a ‘chocolate recipe’…this recipe uses actual melted chocolate. And I think we can agree that using real chocolate is always a better idea!
Jump to:
How do you make chocolate madeleines
While the process for making these shell-shaped treats stays largely the same as baking a classic French madeleine, we are definitely shaking things up a little. And by shaking things up, I mean there’s a good chance I’ll be haunted by a classically trained French pastry chef after posting this recipe. But I’m okay with it. (It seems oddly fitting, somehow.) And once you get a taste of these, you will be too.
Here’s the general process:
- Preparing and mixing your wet and dry ingredients to form your madeleine batter.
- Preparing your madeleine pan.
- Bake it up.
We’re deviating from the traditional madeleine recipe in three ways! Firstly, we’re mixing a melted chocolate-butter mixture of deliciousness into the batter – this gives the madeleine a little whammy of indulgence. Then we’re using a little almond flour to help it retain a little lightness too. And finally, we’re decorating with melted white chocolate for a little extra sweetness…and, uh, Halloween scariness. (OH. SO. SCARY!)
How to get a large bump on your madeleines
The large madeleine bump is honestly a bigger deal than it should be. While it’s certainly a unique characteristic of madeleines, not getting a giant bump by no means takes away from the quality or the flavour of the madeleine.
However, in case that quintessential madeleine shape is something you strive for, here’s what you need to know to get it:
The sweet science behind madeleine bumps
The bump (or the hump) is the result of a burst of steam during the baking process. This steam is caused by the clash of two things:
- The heat of the oven
- The cold madeleine batter
Now, heating up the oven too much is a no-go because we want madeleines, not cookies. But we do have another way to ensure maximum steam.
Keep it chill, bestie
It’s all about keeping that madeleine batter cold. And we’re doing two things to make sure that happens:
- Chilling the batter before you pipe
- Chilling the piped batter AND the madeleine pan before you bake
I know what you’re thinking…why are we chilling twice, Riz? Why not just chill it once, and be done with it? Well, you could do that. But here’s the thing, after you chill the madeleine batter the first time and begin piping it into your madeleine pan, the warmth of your hands will create warmth in the batter.
And while I love the sound of you transferring warmth and affection into your baked goods, creating perfect madeleines is cold, calculated science. And a bit of luck. But mostly that cold, calculated bit. So be cool, and don’t show any warmth to that madeleines batter.
Now, you can just pipe the batter into the madeleine pan, cover, and chill the whole thing for a few hours before baking. But chilling this batter before you pipe it actually makes it a little easier to pipe than when it’s freshly mixed.
As a side note: a number of people refer to madeleines as “madeleine cookies”, I suspect many of these people are in league with a nefarious Halloween spirit. They are the same people that made “chai tea” a thing. They and their false redundancies cannot be trusted. Also, by all definitions, madeleines are ickle little cakes.
(See what I did there?)
(Ugh. Fine.)
(Chai is just the Hindi word for tea, so chai tea is just “tea tea”. And ‘ickle’ is a British way of saying cute and little, so ickle little is “little little”. See? I’m hilarious. My comedy is food puns layered with a cunning commentary of society!)
You should also know that while you can get a madeleine bump using this recipe, the melted chocolate makes it difficult to get a super large bump. While testing, I found that it’s possible to still get that crazy huge bump (yes, even with the melted chocolate), but more often than not, you’ll just get a regular-sized bump, like you can see in the photos.
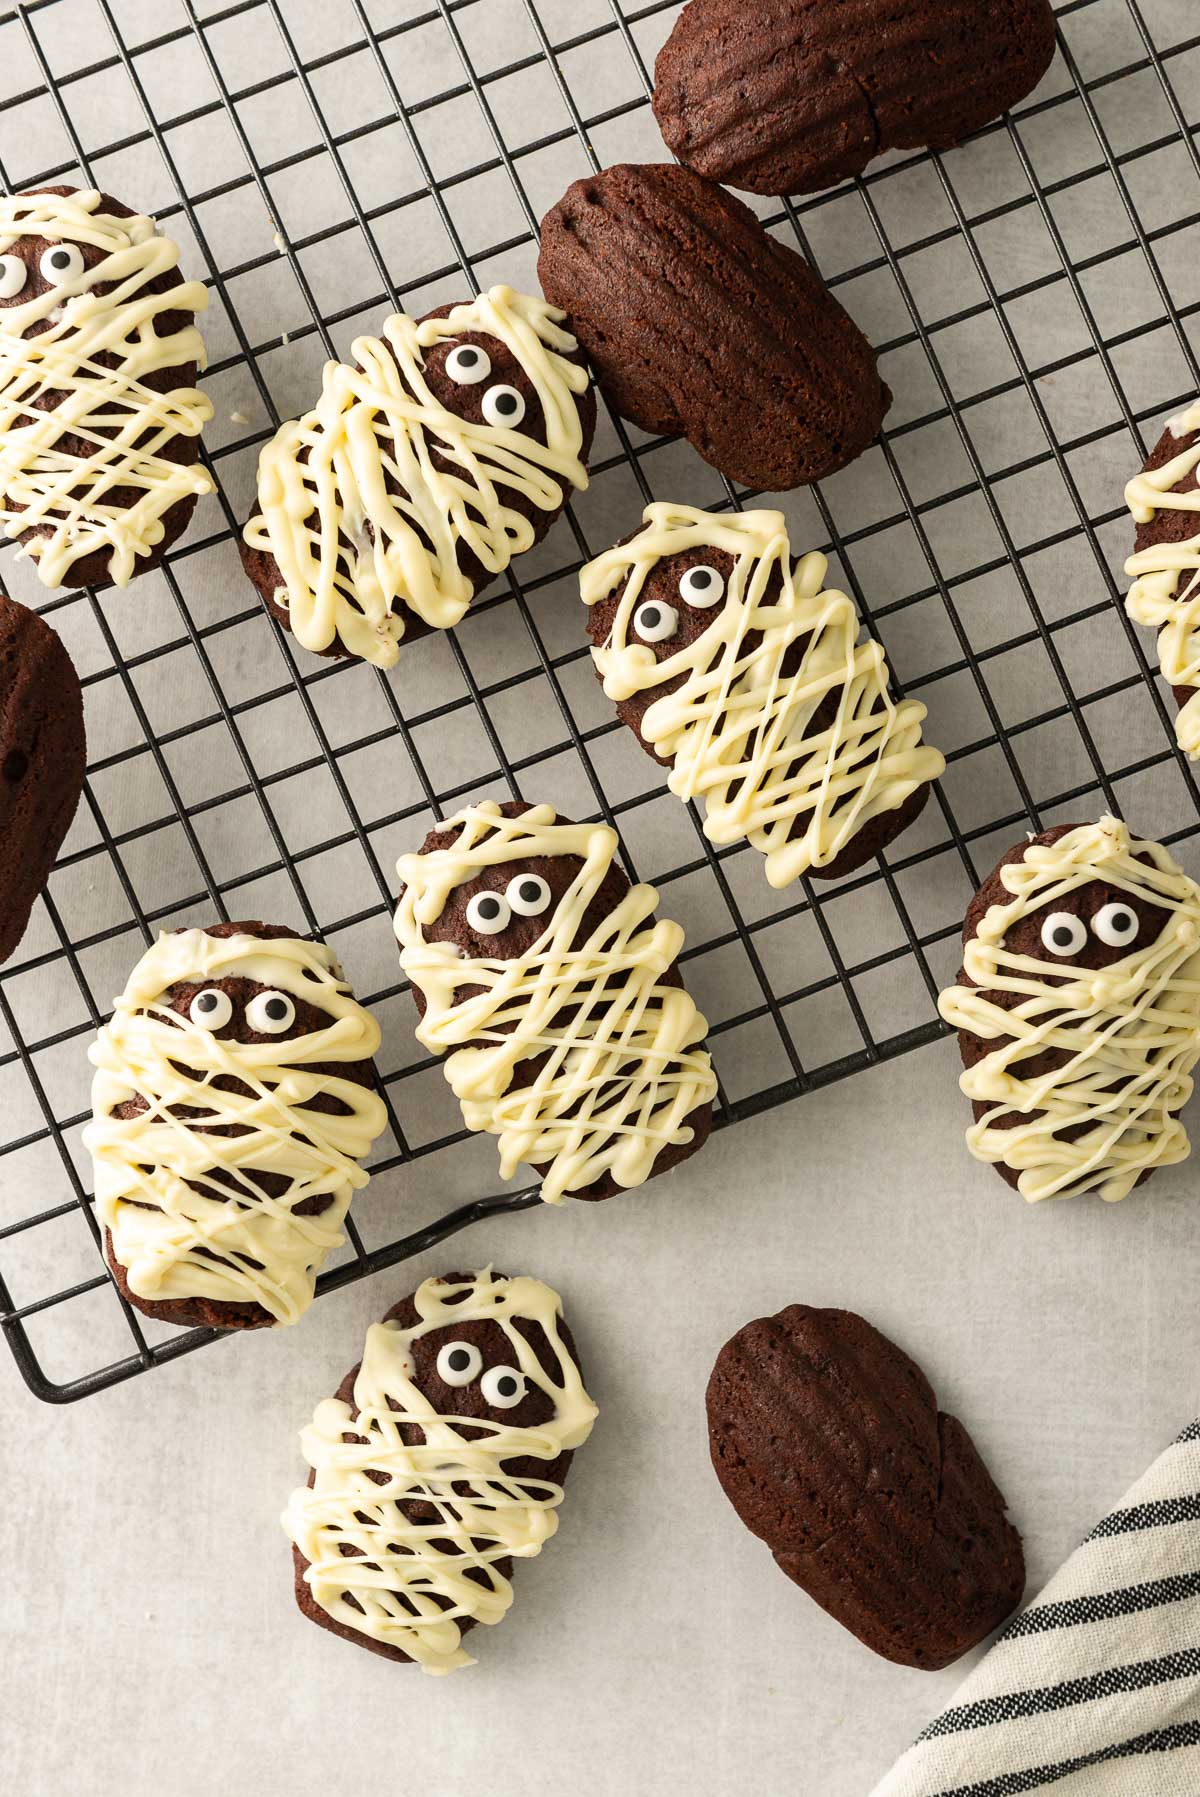
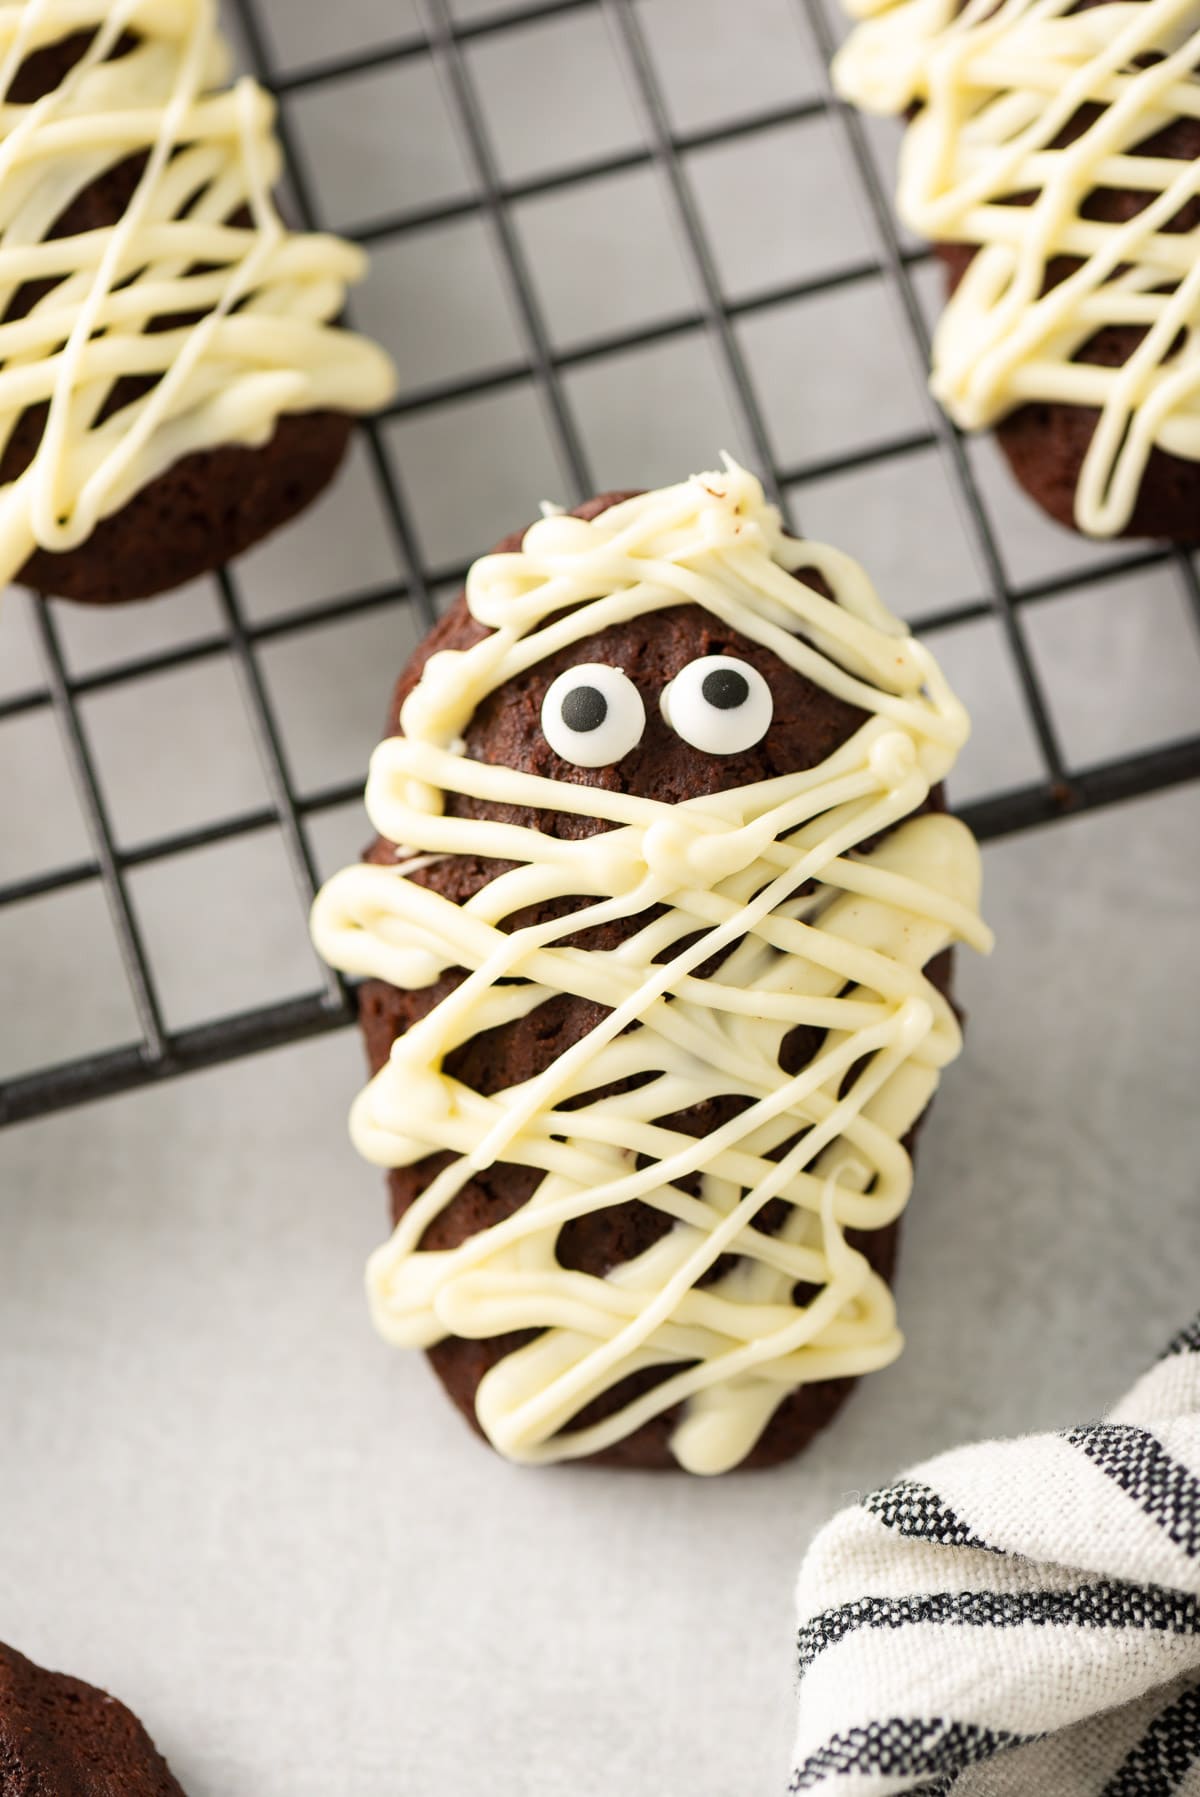
How to decorate Halloween chocolate madeleine mummies
Arts and crafts time, bestie! Since Halloween is coming up, we’re decorating these madeleines to look like oh-so-scary mummies! It’s actually very easy to do. All you need to do is melt some white chocolate, transfer it to a pastry bag (if you don’t have an actual pastry bag, just use a zip lock bag and snip off a corner), and pipe it out to look like the bandages used to wrap mummies.
If you want to go all out, swap out the white chocolate for white chocolate swiss buttercream.
How to decorate if it’s not Halloween
These Halloween madeleines are terrifying to look at. (OH. SO. SCARY!) I realise that you’ll probably be sleeping with the lights on tonight, and that’s my fault. So here’s how you can decorate your madeleines to not look like the Halloween madeleine monstrosities that you see.
Simply dip a corner of each madeleine into the melted white chocolate…and, ta-da! You have fancy White Chocolate-Dipped Chocolate Madeleines. If you want to be extra fancy sprinkle some chocolate shavings on your dipped madeleines for texture and contrast. (I’d opt for just a little bit on the very edge of the madeleine.)
More delicious madeleine recipes
You should know by now that I love madeleine recipes, bestie. They were some of the first things I learnt to bake by myself, and will always be a little extra special to me.
- Chocolate Orange Madeleines
- Lemon Raspberry Madeleines
- Lemon & Poppy Seed Mini Madeleines
- Lemon & Lavender Madeleines
Williams Sonoma
I love Williams Sonoma. The Williams Sonoma store in Toronto’s Eaton Centre is actually my happy place in the mall. It’s been one of my favourite stores for a long time, and I’m super excited to have partnered with them for this post. Here’s a list of the Williams Sonoma products in this post:
- Goldtouch Nonstick Madeleine Plaque Pan
Boo! I mean, that’s it. That’s all I’ve got. Or you know me, I could ramble on forever, but I really need to start creating salt circles around my apartment. You never know where the spirits of classically trained French chefs like to roam during Halloween. (I imagine they stand over my shoulder whenever I’m in the kitchen, shaking their heads, muttering mild French expletives, as they examine my cooking technique.)
If you baked these Halloween madeleines, or even if you just want to say hi, comment below and let me know. Happy Halloween, bestie.
Don’t forget to follow me on Facebook, Pinterest, Instagram, YouTube and Twitter for all the latest. Or just sign up to be a part of my mailing list to have updates delivered straight to your inbox!

Chocolate Madeleine Mummies
- Total Time: 25 minutes
- Yield: 16 halloween mummy madeleines 1x
- Diet: Vegetarian
Description
Chocolate Madeleine Mummies brings all the texture of a traditional madeleine recipe, combines it with the indulgence of chocolate…and makes it fun for Halloween with some easy decorating!
Ingredients
Chocolate Madeleines
- ⅝ cups butter, unsalted (140 grams)
- ⅕ cup dark chocolate, chopped (34 grams)
- 1 teaspoon vanilla extract
- 2 large eggs
- 1 ½ tablespoons honey (30 grams)
- ½ cup granulated white sugar (80 grams)
- 2 ½ tablespoons whipping cream
- ½ cup pastry flour, sifted (56 grams)
- ⅓ cup almond flour, sifted (30 grams)
- ⅓ cup cocoa powder (30 grams)
- 1 teaspoon baking powder (8 grams)
Halloween Madeleine Mummy Decorations
- ½ cup white chocolate, melted
- 32 candy eyes, small
Instructions
- In a small bowl over a water bath, melt the dark chocolate and butter together. Add vanilla and set aside when done. (It should be fairly fluid)
- In a large bowl, whisk together egg and sugar. Add whipping cream. Whisk. Add honey. Whisk again over a water bath, until the sugar has melted and all the ingredients are fully incorporated, about 1 minute.
- Sift the pastry flour, almond flour, cocoa powder, and baking powder into the bowl. Gently fold the dry ingredients into the wet ingredients to create your madeleine batter.
- Mix the melted chocolate/butter into the madeleine batter in 3 batches until incorporated.
- Cover the madeleine batter, and refrigerate for at least 30 minutes. Pre-heat oven to 340 degrees F.
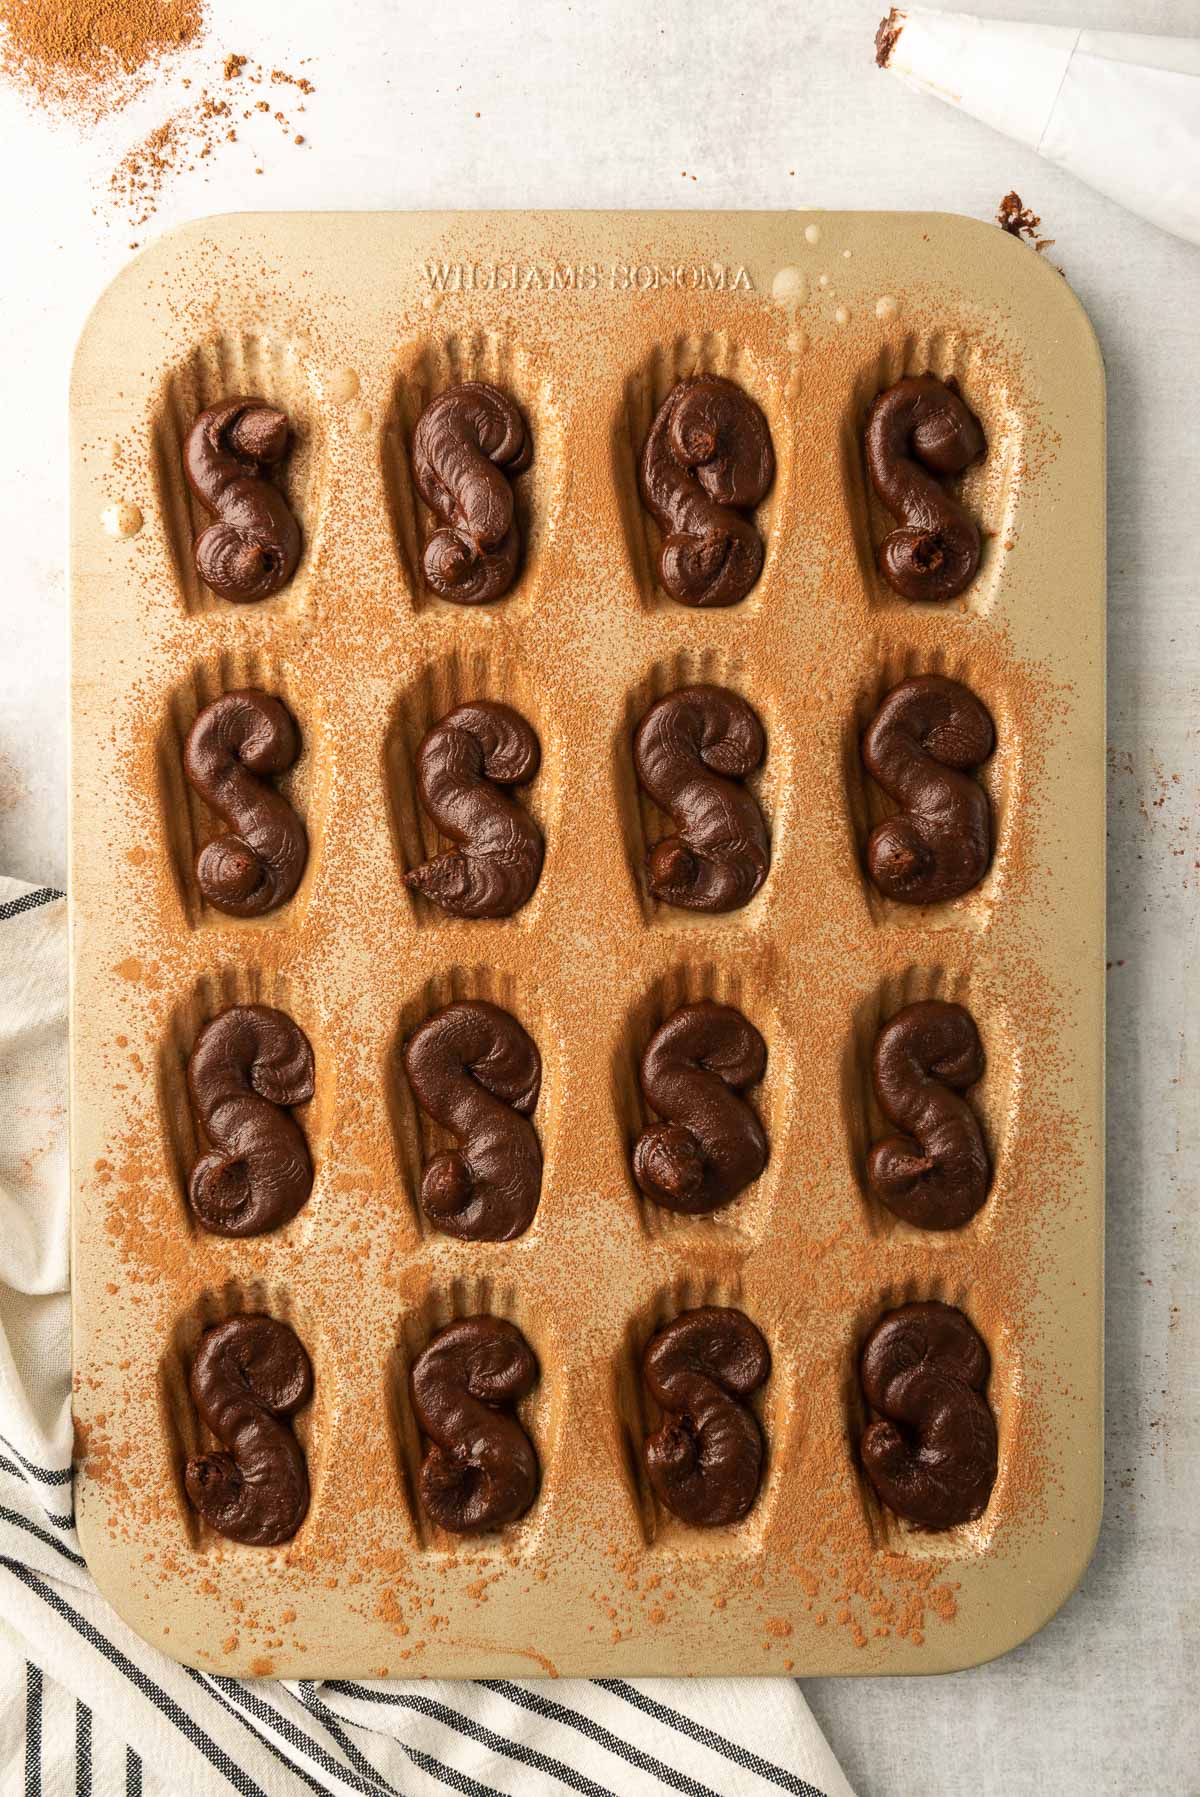
- Prepare your madeleine pan by brushing it lightly with butter and dusting with cocoa powder, tapping out any excess.
- Transfer the batter into a pastry bag, and pipe it into the wells of your madeleine pan. Optional: Cover and refrigerate for another 30 minutes. A cold pan is a good pan.
- Bake for 8-10 minutes. Do not open your oven door early!
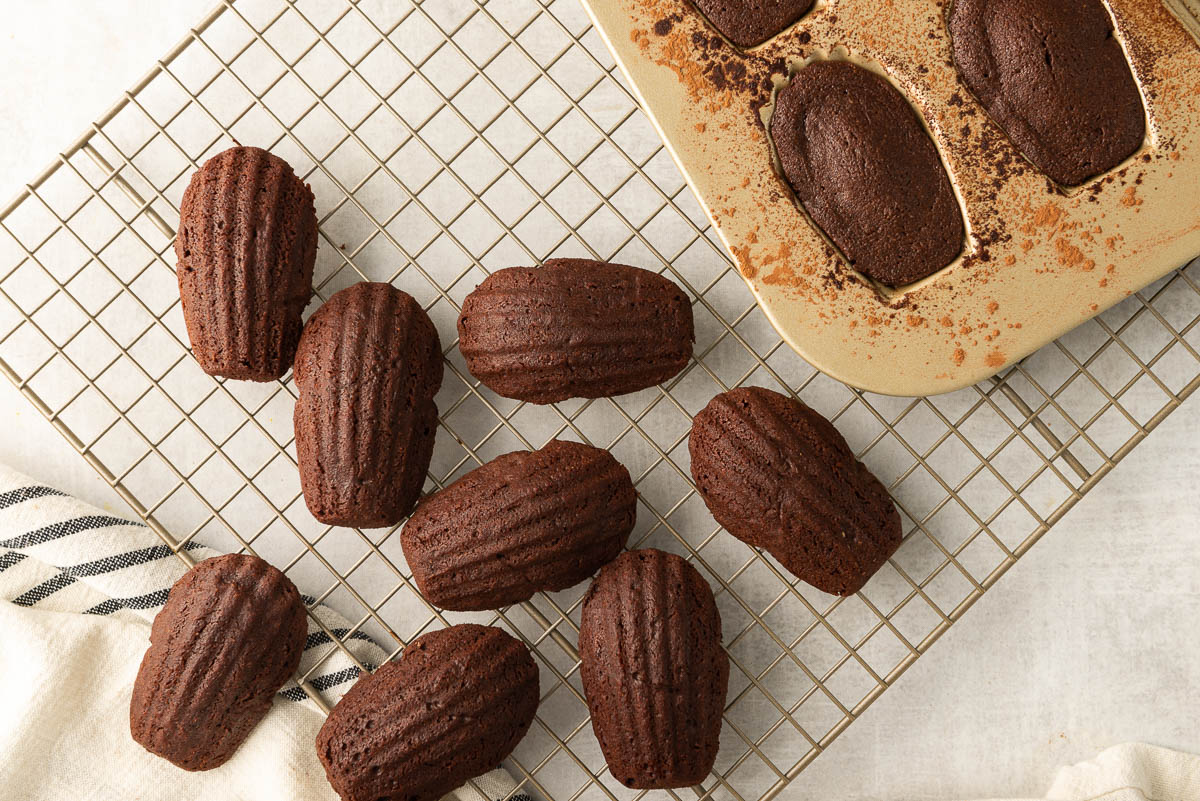
- Once done, tap to release the madeleines. Allow them to cool on a wire rack before decorating.
How to decorate Chocolate Madeleine Mummies
- Transfer the melted white chocolate into a pastry bag with a thin/small tip. Create the madeleine mummy wrappings by piping the white chocolate out in a messy crosshatch pattern (make sure to leave rooms for the eyes!).
- Add in the candy eyes using a tiny bit of white chocolate as glue, if required.
- Store in a cool place. Feel free to say “Boo!” every time you take a bite.
Notes
- It doesn’t take much to melt the sugar in Step 1. A very simple water bath (where you pour boiling water into a pot, and hold the bowl with the egg mixture above it while whisking for a minute or two) is sufficient. Don’t be tempted to stay here too long…you might end up cooking the eggs! Scrambled egg madeleines is not a thing, bestie.
- When you remove the madeleine batter from the fridge, it will be quite stiff. Gently push your spatula through it a few times so you can work with it.
- Don’t worry about piping the madeleine batter into the perfect shape of the madeleine well. As long as you get it in there without making much of a mess, you’ll be fine. I find that madeleine wells are quite forgiving!
- Pop your madeleine pan in the fridge while preparing your batter. A cold pan helps the batter stay cold which results in a bigger madeleine belly (that is, on your madeleine…but yes, also my tummy after testing this).
- Your madeleine pan will affect the baking time. Typically, lighter-coloured pans will result in a quicker bake. The difference isn’t massive, per say. But it’s still worth being aware of.
- If you haven’t been able to find candy eyes, you can make your own googly eyes! Pipe a small (think, mini chocolate chip size) dot using the white chocolate on to a piece of parchment paper. And then pipe a much smaller dot into the centre using melted dark chocolate (you won’t need much). Repeat for each eye. Store in a cool spot so it doesn’t melt away!
- Prep Time: 15 minutes
- Cook Time: 10 minutes
- Category: Dessert
- Method: Baking
- Cuisine: French
Disclaimer: This recipe post has been sponsored by Williams Sonoma. All opinions expressed are my own. Thank you for supporting the brands that support this blog!


Z Sohain
OKAY. SO. CUTE.
NOT SCARY. ADORABLE.
GOOBY EVEN!!!
Riz
LOL! Thank you!
Reem
These are too cute! I can’t wait to try them! Happy Halloween 🎃 Chocolates and Chai!
Riz
Thanks so much! I hope you like them!!
Vincent
Nice, I love madeleine cookies with my chai tea! Just an ickle little sugar though ;-). And I would eat these cute little googly-eyed mummies all year long!
Riz
LOL! …Thank you for reading through the whole post!! And now you know how to make these googly-eyed mummies for year-round consumption!
Aly
Damn! Those look delicious! I’ll have to try out this recipe in our new kitchen after our move.
Riz
Thanks! I hope you like them, and that the move goes well!
Lauren
These look adorable and so delicious! Can’t wait to try the recipe out!!
Riz
Thanks so much, Lauren!! I hope you and Aly try out the recipe soon (and like it!) 🙂
Belinda the Good Witch
I just made these this morning thinking they’d be perfect little treats for tomorrow….We’ve already finished them!!! I’m goign to have to make another batch of these OH SO SCARY LITTLE HALLOWEEN MADELEINES! hahaha
Thank you for the receipe !
Riz
LOL! So happy to hear you enjoyed these so much!!! Hope you had a happy halloween!